Setting of Airdrop on Mac
Related Configure the Airdrop on iPhone and its uses
Before starting the process or steps that how to setup airdrop on Mac. Here, is brief introduction of Airdrop. Airdrop is become popular day by day. Just because of its amazing working and its services. Airdrop all the user to share files with a person who is nearby him without any cost of internet or message. Because airdrop share files over the wireless medium with help of Wifi and Bluetooth. One of the advantage of Airdrop is there is no restriction of size. That means you can share big files too.
To share files through airdrop it is important to setup the airdrop on both Mac's user. The setup of airdrop is not a rocket science. It is very simple process that you can understand it by the following very simple and easy steps(Follow these steps on both users) :-
- First of all you go to "Dock" of your Mac.
- From here, select or click on "Happy Face Finder" icon.

Happy face finder icon - Then click on "Go" option of the "Finder" menu screen of your Mac
- Then select "Airdrop" option from the Sub menu of "Go" option.
- Then "Airdrop" screen will appear.
- In Airdrop screen, Click on "Turn on Wifi and Bluetooth" button.

Turn on wifi and bluetooth
Important Note:-
i)If your Wifi is already turn on then there is option of turn on Bluetooth only and vice versa.
ii)But if both Wifi and Bluetooth are turn on then there is no option or button.
iii)Airdrop needs both Bluetooth and Wifi so both should be "on".
7. Now next step is set your visibility.
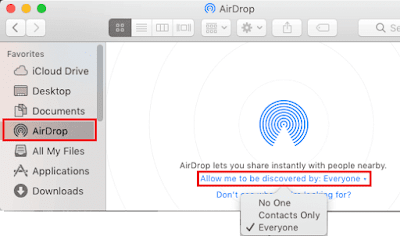
8. Select or click on "Allow me to Discovered by" option.
It has three option. These are:-8. Select or click on "Allow me to Discovered by" option.
 |
| allow me discovered by option in mac |
- No one:- By choosing this option your device is not show to anyone. This option is mostly use when you want no one can send you any file.
- Contacts only:- By choosing this oprion the devices that are save in your contacts are send files or photos etc to you. In this, the both devices should sign in iCloud and both devices should have details of each other in contact app.
- Everyone :- By choosing this option every person even he is not in your contact list can send you files. This option is advice to choose when you test your connectivity to avoid errors. But in this options many "Airdrop spammers" can send you some files that you dislike.
10. Do the above steps on both Mac users.
11. After select "Everyone" or any other option you see the list of available Mac users.
12. If you cannot see any devices then your incoming connections are blocked.
To allow incoming connections
click on "Apple menu icon" -> "System Perference" -> "Security and Privacy" -> "Firewall" - > "Firewall option"
13. Here, you see there is check or tick on "Block all incoming connections"
Uncheck it.
14. Now , you should able to see other Mac user.
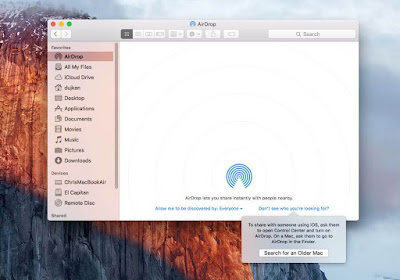
15. If your freind use older Mac than 2012 then to see him click on "Don't see who you are looking for" button or option.
 |
| Don't see who you are looking for button |
17. Now you able to see the Older Mac users.
Now send the files, photo etc that you want to airdrop or share with your friend.
To Airdrop files or Photos etc on Mac:-
Here, is the simple steps to airdrop the files, photos etc. The steps are:-- Now you setup the Airdrop on both users
- Open the file or photos or anything you want to share on Airdrop.
- Select the photos that you want. You can also select more than one photo.
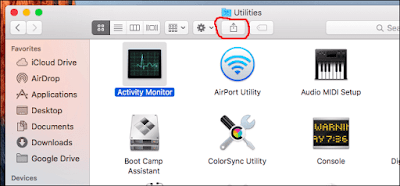
- After selecting photos, Click on share icon or button from the top of your screen.

Share button - A drop down menu will appear. Select Airdrop from here.
- Now Airdrop window will appear containing all available Mac user

Airdrop window - Select one that with you want to share files.
- If both sign on different Apple ID then a pop up on receiver screen with accept or reject option. Once receiver accept your request your files will send to him.
- This method is named as Airdrop through "Share sheet".
- Go to Mac dock select or click on "Happy face finder" icon.
- Now finder screen will appear. Select "Go" option from the menu.
- The sub menu will appear. Select Airdorp from here.

Airdrop option in Go sub menu - Airdorp screen will appear containing all available users.
- Simply drag the file or item you want to airdrop or share and drop it on your friend image or name.

Drag and drop - Again if both you different Apple ID then a Pop up will appear with option of "Accept" or "decline". Once receiver accept your request your files will send to him.
To understand all methods of airdrop on mac Different methods to use Airdrop
So, you see how easy to setup the "Airdrop" on Mac. In this am try to cover all the points related to "Setup the airdrop on Mac". Still if anything is miss then comment it. And please like and share this post.


0 comments:
Post a Comment