Airdrop from iPhone to Mac and vice versa

Airdrop from iPhone to Mac

Today there is number of variety in Mobile phones brands and computer. And there is many things and picture that we want to d\share with someone. But not every person has similar device or same brand mobile phone.  To exchange files with different brands there is many option. Here, two brands are Mac and iPhone and to share files between Mac and iPhone there is one of the easiest and best choice is Airdrop.

Airdrop is not only use to send files between iPhone to iPhone and Mac to Mac. Airdrop is also use to share files iPhone to Mac. Sharing files iPhone to Mac is easy as share files Mac to /Mac and iPhone to iPhone.

Related:- How to airdrop from iPhone to iPhone

To understand the process of how to airdrop iPhone to Mac. Follow these steps:
  1. First of all setup the airdrop on iPhone and Mac both.
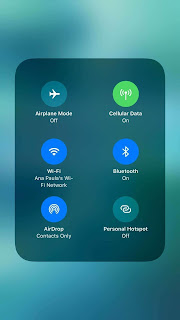
  2. To turn on airdrop on iPhone from control menu or click on share button and then select Airdrop from the options.
    Turn on Airdrop on iPhone
    Turn on Airdrop on iPhone
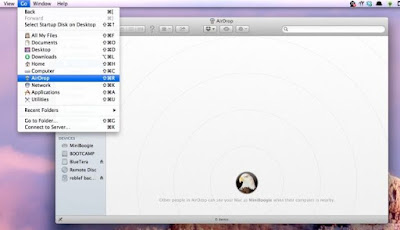
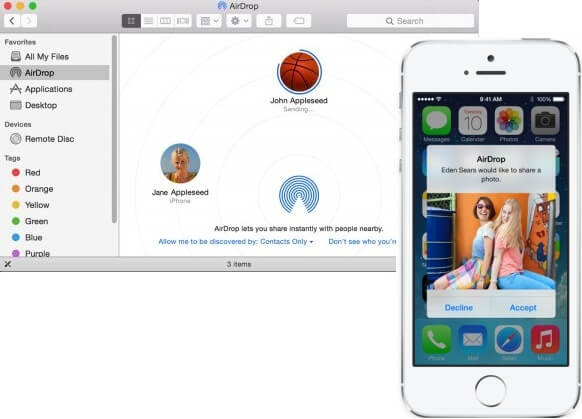
  3. To turn on airdrop on Mac open Finder menu and select Airdrop and other option is click on Go menu and select Airdrop.

    Turn on Airdrop on Mac
    Turn on Airdrop on Mac

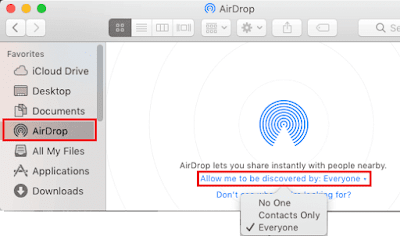
  4. And now check “Allow me discovered by” options that whether it is “Contacts only”,” No one”, ”Everyone”.

    Discovered options in Mac
    Discovered options in Mac

  5. And open Airdrop finder and do not close it till all files are received.  Because it allow airdrop to receive files.

    Airdrop finder window in Mac
    Airdrop finder window in Mac

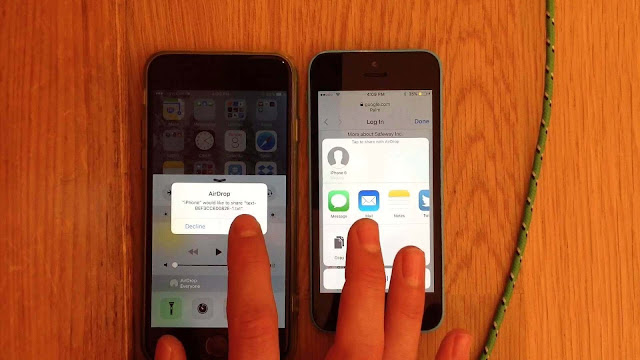
  6. Now on iPhone after select file and choose Airdrop option. The airdrop window will appear.
  7. Wait a moment, the airdrop window show all available users
  8. Now select Mac user and the transfer of files is begin.
  9. Once all files will received, close airdrop window to close further transfer of files.
  10. Now there is question where the airdrop files will go on Mac?
  11. Where do Airdrop files go on Mac:-
  12. In Mac airdrop files are go to download folder. From here you can easily find all files that are sending to you by airdrop.
In this post am cover all topics related to airdrop from iPhone to Mac. If something is miss then comment it.

How to use Airdrop on iPhone

Airdrop on iPhone

Related: The complete guide of Airdrop on Mac
Today iPhone has introduced its more new and amazing features like Anymoji, Face ID, Airdrop and so on. From the iPhone features, Airdrop is one of the most usable features. Airdrop is nothing, it just simple an app use to share files over the wireless media.

Airdrop is best choice to share files to a person who is strand nearby to you with no cost and quickly. Airdrop use the two technologies to share files number one is Bluetooth and second one is Wifi. Airdrop use Bluetooth for check or discover the available users and Wifi to create wireless network between two devices for sharing the files.

Now the question is How to airdrop on iPhone or How to setup Airdrop on iPhone.
Then answer is very easy and understandable. To setup the airdrop on iPhone follow these steps:-
Setup airdrop on iPhone include following things:-

  1. How to turn on Airdrop?
  2. How to turn off Airdrop?
  3. Airdrop different receiving option
  4. Share files through Airdrop

1. How to turn on Airdrop? :-

Airdrop is on
Airdrop is on

If you not find how to turn on your Airdrop and you visit or go to iPhone or iPod settings then you go on to wrong track. Because iPhone give an easy access from the control screen. Follow these steps:-

  1. Swipe up your iPhone screen from the bottom.
  2. Now the control screen or panel is show you see some options like airplane mode etc.
  3. Append control screen, now the other options are display.
  4. Here, you see airdrop, by simple tap on airdrop the airdrop is turn on.

Related: Working of Airdrop in detail

2. How to turn off Airdrop? :-

Turn off your airdrop is so easy. Just tap on airdrop icon in control panel again. It will turn off your Airdrop.

3. Use of different Receiving options:-

Airdrop receiving options

Airdrop has three receiving options. These are:-

  1. Receiving off: - It will block all airdrop requests.
  2. Everyone: - It will allow each and every people that is nearby you whether you know him or not.
  3. Contacts only: - It allows only peoples that are save in your contact list.

4. How to Airdrop files:-

Airdrop files on iPhone


  1. First the person is near to you whom you send media or file.
  2. However airdrop is also reach to person that is in another room if both devices have correct permissions to airdrop.
  3. Airdrop allows you to share media or file from the work you do. That means if you view images then you can send it from here.
  4. You simply select or touch the share button like is  . It will allow you to send or share picture through Airdrop, Facebook, etc.
  5. Now, select airdrop option.
  6. Select the devices with which you want to share your file.
  7. Now, if receiver accepts your request, your file is sent. 


     Setting of Airdrop on Mac

    airdrop on mac

    Related Configure the Airdrop on iPhone and its uses
    Before starting the process or steps that how to setup airdrop on Mac. Here, is brief introduction of Airdrop. Airdrop is become popular day by day. Just because of its amazing working and its services. Airdrop all the user to share files with a person who is nearby him without any cost of internet or message. Because airdrop share files over the wireless medium with help of Wifi and Bluetooth. One of the advantage of Airdrop is there is no restriction of size. That means you can share big files too.

    To share files through airdrop it is important to setup the airdrop on both Mac's user. The setup of airdrop is not a rocket science. It is very simple process that you can understand it by the following very simple and easy steps(Follow these steps on both users) :-

    1. First of all you go to "Dock" of your Mac.
    2. From here, select or click on "Happy Face Finder" icon.
      Happy face finder icon
      Happy face finder icon
    3. Then click on "Go" option of the "Finder" menu screen  of your Mac
    4. Then select "Airdrop" option from the Sub menu of "Go" option.
    5. Then "Airdrop" screen will appear.
    6. In Airdrop screen, Click on "Turn on Wifi and Bluetooth" button.

      Turn on wifi and bluetooth
      Turn on wifi and bluetooth

     Important Note:- 

                 i)If your Wifi is already turn on then there is option of turn on Bluetooth only and vice versa.
                 ii)But if both Wifi and Bluetooth are turn  on then there is no option or button.
                 iii)Airdrop needs both Bluetooth and Wifi so both should be "on".
           7. Now next step is set your visibility.
           8. Select or click on "Allow me to Discovered by" option.
                 It has three option. These are:-

    allow me discovered by option in mac
    allow me discovered by option in mac
    1. No one:- By choosing this option your device is not show to anyone. This option is mostly use when you want no one can send you any file.
    2. Contacts only:- By choosing this oprion the devices that are save in your contacts are send files or photos etc to you. In this, the both devices should sign in iCloud and both devices should have details of each other in contact app.
    3. Everyone :- By choosing this option every person even he is not in your contact list can send you files. This option is advice to choose when you test your connectivity to avoid errors. But in this options many "Airdrop spammers" can send you some files that you dislike.
           9. But here, my advice is you choose "Everyone" if you use it first time to avoid errors.
         10. Do the above steps on both Mac users.
         11. After select "Everyone" or any other option you see the list of available Mac users.
         12. If you cannot see any devices then your incoming connections are blocked.
              To allow incoming connections
              click on "Apple menu icon" -> "System Perference" -> "Security and Privacy" -> "Firewall" -              > "Firewall option"
         13. Here, you see there is check or tick on "Block all incoming connections"
                Uncheck it.
         14. Now , you should able to see other Mac user.
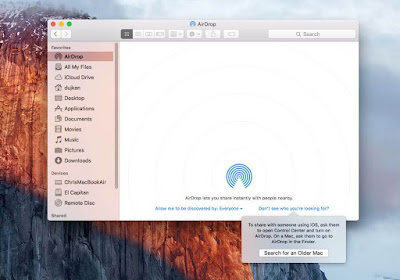
         15. If your freind use older Mac than 2012 then to see him click on  "Don't see who you are                        looking for" button or option.

    Don't see who you are looking for buttton
    Don't see who you are looking for button
         16. The sub menu will appear click or select "Search for an Older Mac"
         17. Now you able to see the Older Mac users.
    Now send the files, photo etc that you want to airdrop or share with your friend.

    To Airdrop files or Photos etc on Mac:-

    Here, is the simple steps to airdrop the files, photos etc. The steps are:-
    1. Now you setup the  Airdrop on both users
    2. Open the file or photos or anything you want to share on Airdrop.
    3. Select the photos that you want. You can also select more than one photo.
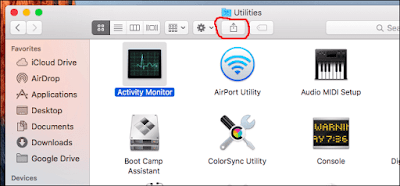
    4. After selecting photos, Click  on share icon or button from the top of your screen.

      share button
      Share button
    5. A drop down menu will appear. Select Airdrop from here.
    6. Now Airdrop window will appear containing all available Mac user

      Airdrop window
      Airdrop window
    7. Select one that with you want to share files.
    8. If both sign on different Apple ID then a pop up on receiver screen with accept or reject option. Once receiver accept your request your files will send to him.
    9. This method is named as Airdrop through "Share sheet".
    But there is also other method named is "Drag and Drop". This method is use when their is no option of Share inside the app.To use this method follow these steps:-
    1. Go to Mac dock select or click on "Happy face finder" icon.
    2. Now finder screen will appear. Select "Go" option from the menu.
    3. The sub menu will appear. Select Airdorp from here.

      Airdrop option in Go sub menu
      Airdrop option in Go sub menu
    4. Airdorp screen will appear containing all available users.
    5. Simply drag the file or item you want to airdrop or share and drop it on your friend image or name.
      drag and drop.
      Drag and drop
    6. Again if both you different Apple ID then a Pop up will appear with option of "Accept" or "decline". Once receiver accept your request your files will  send to him.

    To understand all methods of airdrop on mac Different methods to use Airdrop

    So, you see how easy to  setup the "Airdrop" on Mac. In this am try to cover all the points related to "Setup the airdrop on Mac". Still if anything is miss then comment it. And please like and share this post.

    Troubleshoot the Airdrop Working on Mac

    Airdrop not working

    Related  Airdrop not working on iPhone? 

    In my previous post, we discuss on how to use airdrop on Mac. Today, we discuss on how to troubleshoot the airdrop on Mac. Many people use airdrop on Mac but they also face some problems or troubles with it. The problems like airdrop is not working, airdrop cannot discover the other devices, fail to send files and many more.
    This post is all about how to troubleshoot the Airdrop working on Mac. In this we discuss on following topics:-
    1. Airdrop not working
    2. Airdrop cannot discover other devices
    3. Airdrop is failed to send files
    4. Airdrop with old version of Mac
    Before start troubleshooting, First there is brief introduction of Airdrop.

    Airdrop is one of the amazing feature that is used to share files, photos and so on over the wireless network. Airdrop use bluetooth and wifi to share the files with another people. Airdrop is use too send files with friend who is nearby you. Airdrop use bluetooth to check available user and wifi to share files with user. Airdrop is very fast, easy and no cost feature or method to share files with friend who is stand besides you.

    This is the brief introduction of Airdrop now start discuss the problems that users face to use it and their solutions:-

    1. Airdrop not working:-

    Airdrop not working
    Airdrop not working

    Airdrop not working means faces problems like Airdrop cannot be on. This is happen by following reasons:-
    1. Bluetooth is turn off
    2. Wifi is turn off
    3. Personal hotspot turn on

    Solution:-

    As airdrop needs both Bluetooth and wifi if one it is turn off it will not work. Following are the solutions:-
    1.   If Bluetooth is off then turn it on.
    2.   If Wifi is off then turn it on.
    3.   If bluetooth or wifi are on then off it then again on it.
    4.   If personal hotspot is on then off it.

    2. Airdrop cannot discover other devices:-

    Airdrop cannot discover other devices
    Airdrop cannot discover other devices

    Sometimes airdrop is on but it is not able to discover the other devices. It has many reasons like:-
    1.   If receiver set "Contacts only: option from "Allow  me to be discovered by"
    2.   If receiver set "Block all incoming connection".

    Solution:-

    1.  If receiver set Contacts only and you or sender is not present in contact list then save sender's detail
    2.  If receiver on Block all incoming connection then turn off it from Security and privacy preference of Mac
    3. The best solution is set Everyone option to overcome the problem of invisibility to another user.

      3. Airdrop is failed to send files:-

      Sometimes everything is right but still airdrop is failed to send files. This is because:-
      The devices are not closer to each other

      Solution:-

      Solution of it it simple:
      1.  Both devices under 30 feet area that means both devices should be closer to each other.
      2.  Airdrop cover 30 feet(9 meter) area.

      4. Airdrop with old version:-

      To access old version
      To access old version

      There is also problem when you airdrop with older version of Mac.

      Solution:-

      If you face problem to airdrop with Mac old version that never means it is not work with old version. Airdrop also work with Mac old versions. To airdrop with old version of Mac follow these steps:-
      1. Airdrop has one of the mode named is "Legacy mode". It is work with 2012  or old Mac both
      2. When airdrop with old version select legacy mode.
      3. If the receiver has old version then go to "Don't see who you're looking for?" in the Airdrop window of the sender's Mac.
      4. Then click on "Search for an Older Mac" button.
      5. After this, computer will automatically start scan to find user who has older Mac.
      6. To get out from legacy mode simply click on Cancel button.
      In this post, am try to cover all the problems that user face while using airdrop on Mac and their solutions. But if you face any other problem while using airdrop then comment it. And please like and share the post.


      How to use Airdrop between Mac users


      Related  Using Airdrop between iPhone's users
      Today every people wants to share media fast and quickly. Mostly people use Internet to share media with their friends which is sometime time consuming. Their is one option to share media with friend which is fast and quick named as 'Airdrop'. Airdrop is one of the feature of iPhone as well as Mac.

       Airdrop share photos, videos etc over the wireless network without using any data and very quickly.
      Airdrop give access to user to share documents, photos between Mac users. Today we discuss on how to share media between Mac's user through Airdrop. Mac Os has different methods to airdrop the files with others. We discuss on following topics :-

      1. Airdrop through drag and drop on Mac OS
      2. Airdrop through context menu on Mac OS
      3. Airdrop through share sheet on Mac OS
      4. Things to keep in mind
      5. Select method to airdrop photos, videos etc between Mac's user
      The very first step is setup the airdrop on both Mac's user.

      1. Airdrop through drag and drop on Mac OS:-


      Airdrop through drag and drop
      Airdrop through drag and drop

      Drag and drop method is very interesting and fast method to share number of files with your friends. And also this method is very simple method. Because you simply drag and drop the items. Follow these steps to use or understand this method:-
      1.  First step is setup your Airdrop.
      2.  Then select "Go" from the finder menu of Mac
      3.  Then select Airdrop from number of options
      4.  The airdrop menu will appear
      5.  In this, you see number of users who are available
      6.  Now, simply drop the files that you want to share on sender image or name.
      7.  When you drop all the items that you want to share then click on "Send" button.
      8.  After clicking your files will send to your friends.

      2. Airdrop through context menu on Mac OS:-

      Airdrop through context menu
      Airdrop through context menu

      There is also an other option to use airdrop that is context menu. This method is also very simple. In this, user use right click instead of drag and drop. Follow these steps to understand how to use it :-
      1.   Select file that you want to share or
      2.   Start Finder on your Mac
      3.   Find and select file that you want to share
      4.   Then right click on item
      5.   A drop down menu will appear
      6.   Select Share option. It has other sub menu
      7.   Choose Airdrop from the sub menu.
      8.   Airdrop display is on
      9.   Which contains list of user
      10.   Select picture of user with which you want to share your files
      11.   And then click on done.
      12.   Your files will send to user.

      3. Airdrop through share sheet on Mac OS:-

      Airdrop through share button
      Airdrop through share button

      There is also one more option to airdrop the files on Mac that is Share Sheet or you can say Share button. Follow these steps to understand it:-
      1.  In this, you simple click on share button
      2.  That is usually on right top of screen
      3.  Sub menu of Share will display
      4.  Select Airdrop
      5.  Airdrop menu or list of available user will appear
      6.  Choose picture or user with which you want to share
      7.  When recipient accept your request
      8.  The file will send and it is done.

      4. Things to keep in mind:-


      While using Airdrop on Mac some important points that you should keep in mind are:-
      1. If both of you the sender and receiver signed in iCloud then items are accepted and stored automatically.
      2. But if the receiver is not signed in iCloud then items are not stores till the receiver accept your request.

      5. Select method to airdrop photos, videos etc between Mac's user:-

      Airdrop on Mac
      Airdrop on Mac

      Now, we study all methods to use or access airdrop in Mac. Let's Start to airdrop the pics, videos and so on.
      first decide which method you want to use. Select method by following questions.
      1. Want to share many files and quickly
      2. Want to share single file
      3. Want to share file that you read at that time
      Answer of above questions are following:-
      1. If you want to airdrop many files then go with Drag and Drop method.
      2. If you want to airdrop single file then you go with context menu.
      3. If you want to share file that you read at same time go with Share button.
      These are simply advice that is not hard and fast rule. You are free to choose method according to your need.
      In this post am try to cover all the topics related to use airdrop on Mac. But still if you have any topics that is related with it and important comment it. And don't forget to like and share the post.


      Having Trouble with Airdrop working?

      In previous posts, we discuss about how to use airdrop from iPhone to iPhone and also some brief introduction about airdrop troubleshoot. As the user, use airdrop facing some problems such as airdrop is not working that is possible due to many reasons like Bluetooth is not enable, receiving off mode of it is enable there is many reasons of improper working of it. So there is the reasons with solutions that why airdrop is not working. These are:-

      1. Check airdrop visibility
      2. Check both devices enable airdrop 
      3. Are Bluetooth and Wifi enable or disable?
      4. Devices should under 30 feet to each other
      5. Check your mobile mode(Do not disturb)
      6. Is airplane mode is on?
      7. Check personal hotspot is enable or disable 
      8. Check airdrop receiving option
      9. Does airdrop is supported by your device
      10. Are both devices signed in iCloud?


      1. Check airdrop visibility:-

      Airdrop visibility options
      Airdrop visibility options
       
      It should be enable by manually. You should enable it from control center. Here, you have three options of it visibility that are:-
      1. Receiving off:- This mode disable your device visibility that means your device is not discover by other devices.
      2. Contacts only :- This mode allow the other devices that are present in your  contact list to discover your device and share files with you.
      3. Everyone:- This mode allow each and every device whether it is present in your contact list or not.

      Solution:-

       From these options you adjust your airdrop visibility according to your need. To avoid invisibility you should select Everyone mode.

      2.Check both devices enable airdrop :-

      It should be enable by manually so both user check that their airdrop is enable or not? If one of the airdrop is disable then it will not working.

      Solution:-

      Both devices should enable their airdrop. 

      3. Are Bluetooth and Wifi enable or disable?:-

      Both WiFi and Bluetooth on
      Both WiFi and Bluetooth on
       
      As we know airdrop needs both Bluetooth and WiFi. If one of them is disable or off then It is not working properly. Airdrop needs wifi to transfer the data and Bluetooth to check the device to which the file is send.

      Solution:-

      Both Bluetooth and Wifi should be enable.

      4. Devices should under 30 feet to each other:-

      As, airdrop work with Bluetooth and Bluetooth need both devices are closer. If both devices are not closer then there is trouble in transfer of file.

      Solution:-

      The devices must be under 30 feet area which is cover by the bluetooth.

      5. Check your mobile mode(Do not disturb):-

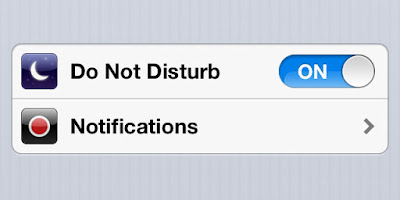
      Do not disturb mode is on
      Do not disturb mode is on

      Our device has many mode such as ringing and one of them is Do not disturb which is also responsible improper working of airdrop. Because Do not disturb mode make it undiscovered by other devices.

      Solution:-

      You should off this mode to visible your device to another devices.

      6. Is airplane mode is on?:-

      Airplane mode is on
      Airplane mode is on
       
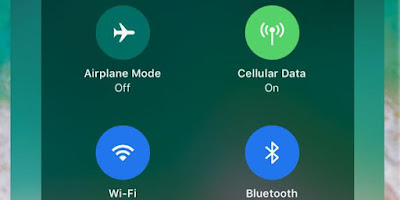
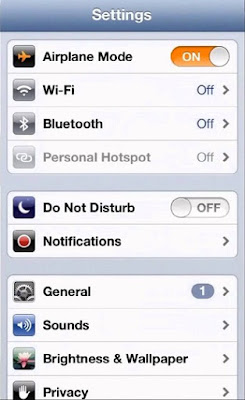
      One of the other mode of mobile phone is Airplane mode which is also responsible for its improper working. Because airplane mode shut down all wireless network in iOS.

      Solution:-

       Off or exit airplane mode because airdrop need both bluetooth and wifi.

      7. Check personal hotspot is enable/ disable :-

      Personal Hotspot is on
      Personal Hotspot is on
       
      If it is not working then there is also one reason that is enable personal hotspot . Because  personal hotspot also require wifi .In iPhone there is message in iOS that airdrop will not work because personal hotspot is on.

      Solution:-

      Turn off your personal hotspot..

      8. Check airdrop receiving option:-

      Airdrop receiving option
      Airdrop receiving option
        
      It has one of the receiving option that is Contacts only that will interrupt its working. As receiving device set Contacts only mode and your device is not in his address book then your device cannot share the file.

      Solution :- 

      It has two solution:-
      1. The receiving device save your device name into its address book.
      2. else receiving device select Everyone mode or option of it.

      9. Does airdrop is supported by your device:-

      Sometimes , it is not working because your device is not support it. Your device must have newer chip of Bluetooth and wifi.

      Solution:-

       To check your device is support it or not? Open the control menu by swipe up if airdrop is present in menu then your device is support it.

      10. Are both devices signed in iCloud?:-

      If both devices set Contacts only mode then they should signed in iCloud and having contact detail in contact app.

      Solution:- 

      If one of your devices is not signed in iCloud then first signed in ( Only in Contacts only mode)


      Still your airdrop will not work by using above tips. Then try some following tips:-

      1. Check the receiving device screen is on because airdrop is available only if receiving device screen on.
      2. Restart your WiFi.
      3. Sign out from iCloud then again Sign in.
      4. Restart your iOS.
      5. Disable Bluetooth and then again enable your Bluetooth.
      6. Never use uppercase characters for your Apple's ID.

      In this post, i am try to cover all the topics related to airdrop improper working but still if something is miss then comment me. And like and share this post with your friends.


      iPhone: Generations From first to eleventh

      Today, Smartphone becomes a essential part of our life. We totally depend on our phones to do anything like to make documents, photography and even a small work like to see the Date, day and also time. In market there are many options of Smartphones or you can say mobile phones. To select which phone is best is quite tough to select one. There is one option in Smartphone is iPhone.

      If someone wants advance features, better performance, and he has no problem of money then he should go to buy iPhone. It provides many features to its user named as Facial recognition, Animojis, Airdrop, better camera quality etc.

      It score highest position in Smartphone brands. iPhone is a product of “Apple”.

      “The first iPhone is released on 29th June 2007 By Apple Inc.”
      “Now iPhone released it eleventh generation that is iPhone-X on 3rd November 2017.”

      iPhone X  becomes more popular around the world due to its amazing features. Till now iPhone has introduced its 11th generation. It has following models:-

        1. iPhone :- 

        iPhone

         This is the first generation of it and it is launched on 29th June 2007. It was the original iPhone which change the world. It is refer as 2G because it was the only who ship with 2G network.

        2. iPhone 3G :-

        iPhone 3G


        It is the second generation. It was released on 9th June 2008. It is similar as the original iPhone but it has some extra external hardware features such as GPS, 3G data and triband UMTS/ HSDPA. It has also some additional; features like push email and turn by turn navigation. It introduced the Apple Store from where people can download or installl the Apple's app.

        3. iPhone 3GS:-  

        iPhone 3GS


        It is the third generation that introduced on 8th June 2009. In its name 3GS, the S is stood for Speed. It improves  as improvement in performance, 3 mega pixel camera, voice control, video ability and support for 7.2 Mbits/s downloading.

        4. iPhone 4:-

        iPhone 4


        It is the fourth generation  and introduced on 21th June 2010.It has new hardware design as Retina Display and support for Face Time. It was the first who introduced the front camera.

        5. iPhone 4S :-

        iPhone 4S


        It is the fifth generation of taht introduced on 14th October 2011. In its name 4S, the S stood for Siri. Siri is a virtual assistance present in mobile work as people commands. It also has good camera quality.

        6. iPhone 5 :-

        iPhone 5


        It is the sixth generation that is introduced on 21th September 2012. With its  Apple again change the design such as aluminum based body which is thinner and light weight as compared to previous designs, taller screen and also support LTE that is 4G network and it also change the 30 pin charging port to Lighting port.

        7. iPhone 5C:-

        iPhone 5c


        It is the seventh generation that was introduced on 20th September 2013. It does not offer high storage as compare to other technology.

        8. iPhone 5S:-

        iPhone 5S


        It is the seventh generation  that was introduced on 20thSeptember 2013. It was come with new features such as Apple finger print technology, Touch ID and it also provide the feature M7 motion to track the steps throughout the day.

        9. iPhone 6 and 6 Plus:-

        iPhone6 and plus


        They are eight generation that introduced on 19th September 2014. It has some improvements such as improve in design, battery life and camera. It had more advance camera to take better picture.

        10. iPhone 6S and 6S Plus:-

        iPhone6S and plus


        It is ninth generation that is introduced on 25th September 2015. It has some extra feature than its previous model include improved fingerprint recognition, high mega pixel camera such as 12 megapixel and advance LTE technology and it also support "Hey Siri" without plugged in.

        11.iPhone SE:-

        iPhone SE


        It is introduced on 31st March 2016. Here, SE means Special Edition. It offer small screen such as 4 inch.

        12. iPhone 7and 7 Plus:- 

        iPhone7 and plus


        Now, we start taking about the current models such as iPhone 7and 7 Plus. It was tenth generation of that introduced on 16th September 2016. It has similar design as iPhone 6 but also has some new options such as color option, dust and water resistance and it remove the headphone jack. It also the dual camera feature.

        13.iPhone 8 and 8 Plus:-

        iPhone8 and plus


        It is the eleventh generation that is introduced on 22nd September 2017. It has back of glass and also some additional features such as wireless charging, improve camera and display and fast processor.

         14. iPhone X :-

        iPhone X


        Finally, we come to latest and trending model that is iPhone X. It is also the eleventh generation that is introduced on 3rd November 2017. Here X, is sign of tenth that represent the tenth anniversary of iPhone series. It removes the home button. It come with amny new and amazing features such as Wireless charging, new type of password that is named as Face ID, also introduced Animoji feature that is animated emojis.

        So, this is all about the iPhone generations and its models . From the above you will get knowledge about each and every model. In this am try to cover all topics but still if something is skip then please comment. And also like and share the post.
        Airdrop:Transfer any media from iPhone to iPhone


        Sharing through airdrop on iPhone
        Sharing through airdrop on iPhone


        Related  How to use Airdrop on Mac

        Airdrop is one of the features of iPhone that we use daily in our life. Now you ask how? Then the answer is- In our day to day life there are many things that we want to share it with our friends. These things are anything like photo that we click or find over the internet, some official documents, messages, and video and so on. Mobile phones are helping us to share all things with our friends. Mobile phones provide us many ways of sharing like messages, some social networking app etc. But if you want to share something your friend who is nearby to you then which is the cheapest and best way to share.

        One of the best and cheapest ways is provide by the iPhone that is Airdrop. Airdrop is very cheapest and best way to share files, photos, videos etc to friend who is nearby to you. Because with the help of Airdrop one can share anything without spend any money even without size restriction. 
        Now, let’s start to know about Airdrop that how airdrop from iPhone to iPhone. In this you get knowledge of how to Airdrop on the following topics:-


        Share any media through airdrop on iPhone
        Share any media through airdrop on iPhone

        1.  Airdrop the photos from iPhone to iPhone (iPad)
        2. Airdrop the videos from iPhone to iPhone (iPad)
        3. Airdrop the Contacts from iPhone to iPhone(iPad)
        4. Airdrop the documents from iPhone to iPhone(iPad)
        5. Airdrop the group of photos and videos from iPhone to iPhone(iPad)
        6. Airdrop the photo, videos etc  in group of people

        Airdrop on iPhone is use to share photos, videos, document etc with your friends as following:-

        Related: Airdrop not working on iPhone? try this.

        1. Airdrop the photos from iPhone to iPhone (iPad):-

        Airdrop photos on iPhone
        Airdrop photos on iPhone


         There is many pictures that we see or find on internet or we click and want to share them with friends. Airdrop provide that facility (share the pictures). To share photos with your friend and both on iPhone then follow these steps:-

                  i.  Open your gallery, select photo you want to share.
                ii.   Touch or click share button.
               iii.    Select Airdrop option.
              iv.      After selecting airdrop, you see list of available devices.
                v.      Choose with which you want to share your photo.
              vi.      Once he accepts your airdrop request a “sent” is display under your friend device name.

        2. Airdrop the videos from iPhone to iPhone (iPad):-

        Airdrop also allows the peoples to share the videos with your friends. The steps to share the video with your friend is same as to share the photo choose or select video instead of photo. The steps are following:-

                  i.  Select the video from your mobile that you want to share.
                ii.   Touch or click share button.
               iii.   Select Airdrop option.
              iv.     After selecting airdrop, you see list of available devices.
                v.    Choose with which you want to share your  video.
              vi.      Once he accepts your airdrop request a “sent” is display under your friend device name.

        3.  Airdrop the Contacts from iPhone to iPhone (iPad):-

        share a contact through airdrop
        Airdrop contacts on iphone


         Sometimes we need to share some contacts with our friends. So, rather to dictate the contact details do it with airdrop. Airdrop help to share the name card with friends. Follow these steps:-

                 i.  First open your ‘Phone’ app.
               ii.  Now tap on the name or contact you want to share.
              iii. Options are come by which you share your contact.
             iv.   Select Airdrop .
               v.   Once your friend accept your request, “sent” is display under device name.

        4. Airdrop the documents from iPhone to iPhone (iPad):-

        share document
        Airdrop documents on iPhone

         In exam days, mostly one thing is share between the friends that is notes or you can say documents. One can also Airdrop the documents with his friends. Follow these steps:-

                 i. Firstly select a file or document you want to share with your friend.
               ii.  Touch the share button.
              iii.  Select the airdrop option.
             iv.   Now, you see a list of available devices select one with you want to share it
               v.  Once he accepts you request the file will sent to him.
             vi.  And “sent” is display under its device name.

        5. Airdrop the group of photos and videos from iPhone to iPhone (iPad):-

        Share group of photos through airdrop
        Airdrop group of photos on iphone


        In above, we talking about single photo or video or document etc to share but that does not mean you cannot share a more than one photo etc or group of photos , videos etc. Airdrop allow you to share a group of photos, videos and so on.

                 i. To send group of photos and other media simply select more than one photo.
               ii.   And then tap on share button
              iii.  Select the Airdrop
             iv.   Now, select the person with which you want to share that group of photos.
               v.  Once he accept your airdrop request, the will sent.
             vi.  And “sent” is display under his device name.

        6. Airdrop the photo, videos etc in group of people:-

        Unlikely, till now airdrop does not allow to share the files to multiple users. That means, you should send or share the pics etc. to your friends one by one.

        In this post, am try to cover all the topics related to airdrop iPhone to iPhone. But still if you have any topics related to iPhone that is important and am not cover then please comment it and like and share this post.